
Spring MVC and Hibernate Tutorial
Spring is a lightweight framework. it provides support to various frameworks such as Hibernate, Struts, Tapestry, EJB, JSF, etc.
Modules: IOC(Inversion of control), AOP(Aspect Oriented Programming), DAO(Data Access Object), Context,ORM(Object-relational Mapping), Web, MVC(Model View Controller). etc.
This is a step-by-step tutorial that helps you build a Spring-Hibernate application easily in a clear and concise way. In this first part, we demonstrate how to code a simple Spring MVC application that displays a list of users from MySQL database.
1. Create Database Name is demo and Database Table name is springhibernet.
Open NetBeans See The Menu Bar go to the file Menu Click on the New Project(Ctrl+Shift+N) and Select Left site categories Java/java web and Project categories to Right Site Project java/web Application .You have to give The Program Name "SpringHibernateTutorial". if you wont to save Project Location you can Browse and File save on the direction place and Gone a default Place and Now uncheck/check the check box and click on the next button, select server settings and select The Spring Web MVC Framework 4.0 and Hibernate Framework 4.3 and go to the finish.

This is automatic generated page code with custom according to performance.
2.applicationContext.xml
3.dispatcher-servlet.xml
4.web.xml
5.redirect.jsp
There are default package with custom and controlling package classes.
6.default package
A. hibernate.cfg.xml
B. hibernate.reveng.xml
7. controlling package
B. Springhibernet.hbm.xml
c. HibernateUtil.java
2. This is the view controlling package name is "com.spring.module".
A. view.java
Web browser page index.jsp and view.jsp.
8.index.jsp

9. view.jsp

Modules: IOC(Inversion of control), AOP(Aspect Oriented Programming), DAO(Data Access Object), Context,ORM(Object-relational Mapping), Web, MVC(Model View Controller). etc.
This is a step-by-step tutorial that helps you build a Spring-Hibernate application easily in a clear and concise way. In this first part, we demonstrate how to code a simple Spring MVC application that displays a list of users from MySQL database.
1. Create Database Name is demo and Database Table name is springhibernet.
Open NetBeans See The Menu Bar go to the file Menu Click on the New Project(Ctrl+Shift+N) and Select Left site categories Java/java web and Project categories to Right Site Project java/web Application .You have to give The Program Name "SpringHibernateTutorial". if you wont to save Project Location you can Browse and File save on the direction place and Gone a default Place and Now uncheck/check the check box and click on the next button, select server settings and select The Spring Web MVC Framework 4.0 and Hibernate Framework 4.3 and go to the finish.

This is automatic generated page code with custom according to performance.
2.applicationContext.xml
3.dispatcher-servlet.xml
4.web.xml
5.redirect.jsp
There are default package with custom and controlling package classes.
6.default package
A. hibernate.cfg.xml
B. hibernate.reveng.xml
7. controlling package
- This is the Bean class and hbm file package name is "com.pojo.file".
B. Springhibernet.hbm.xml
c. HibernateUtil.java
2. This is the view controlling package name is "com.spring.module".
A. view.java
Web browser page index.jsp and view.jsp.
8.index.jsp

9. view.jsp

Many-To-Many Hibernate Mapping
Many to Many Mapping : A many-to-many relationship refers to a relationship between tables in a database when a parent row in one table contains several child rows in the second table, and vice versa. Many-to-many relationships are often tricky to represent.

Many-to-Many mapping is usually implemented in database using a Join Table, for example we can have Cart, Item table and Cart_Items table for many-to-many mapping. Every cart can have multiple items and every item can be part of multiple carts, so we have a many to many mapping here.
1. Create Database Name is manytomany and Three Table are item, cart_items and cart.
Open NetBeans See The Menu Bar go to the file Menu Click on the New Project(Ctrl+Shift+N) and Select Left site categories Java/java web and Project categories to Right Site Project java/web Application .You have to give The Program Name "manytomany". if you wont to save Project Location you can Browse and File save on the direction place and Gone a default Place and Now uncheck/check the check box and click on the next button, select server settings and select the frameworks like Hibernate and go to the finish.
2. hibernate.cfg.xml
3. hibernate.reveng.xml
4. Item.java
5. CartItems.java
6. CartItemsId.java
7. Cart.java
8. Item.hbm.xml
9. CartItems.hbm.xml
10. Cart.hbm.xml
11. ManyToMany.java
OUTPUT:
One-To-Many Hibernate Mapping
One to Many Mapping: A single attribute of a table relating with multiple attributes of another table is referred as One to Many mapping.
A department may have multiple employees.

1. Create Database Name is mapping and Two Table are employee1 and department.
Open NetBeans See The Menu Bar go to the file Menu Click on the New Project(Ctrl+Shift+N) and Select Left site categories java web and Project categories to Right Site Project web Application .You have to give The Program Name "OnetoManyMapping". if you wont to save Project Location you can Browse and File save on the direction place and Gone a default Place and Now uncheck/check the check box and click on the next button, select server settings and select the frameworks like Hibernate and go to the finish.
2. hibernate.cfg.xml
3. hibernate.reveng.xml
4. Employee1.java
5. Department.java
6. Employee1.hbm.xml
7. Department.hbm.xml
8. OnetoMany.java
OUTPUT:
One-To-One Hibernate Mapping
A one-to-one relationships occurs when one entity is related to exactly one occurrence in another entity. Thus, there will be one primary key which will be mapped with both the entities.
1. Create Database Name is mapping and Two Table are employee and employeedetail.
Open NetBeans See The Menu Bar go to the file Menu Click on the New Project(Ctrl+Shift+N) and Select Left site categories java web and Project categories to Right Site Project web Application .You have to give The Program Name "Mapping". if you wont to save Project Location you can Browse and File save on the direction place and Gone a default Place and Now uncheck/check the check box and click on the next button, select server settings and select the frameworks like Hibernate and go to the finish.

2. hibernate.cfg.xml
3. hibernate.reveng.xml
4. Employee.java
5. Employeedetail.java
6. Employee.hbm.xml
7. Employeedetail.hbm.xml
8. OnetoOnemapping.java
9. output-
1. Create Database Name is mapping and Two Table are employee and employeedetail.
Open NetBeans See The Menu Bar go to the file Menu Click on the New Project(Ctrl+Shift+N) and Select Left site categories java web and Project categories to Right Site Project web Application .You have to give The Program Name "Mapping". if you wont to save Project Location you can Browse and File save on the direction place and Gone a default Place and Now uncheck/check the check box and click on the next button, select server settings and select the frameworks like Hibernate and go to the finish.

2. hibernate.cfg.xml
3. hibernate.reveng.xml
4. Employee.java
5. Employeedetail.java
6. Employee.hbm.xml
7. Employeedetail.hbm.xml
8. OnetoOnemapping.java
Hibernate
Hibernate Overview: Hibernate is an Object-Relational Mapping (ORM) Solution for JAVA AND it rose as open source persistent framework created by Gavin King In 2001. It is a Powerful, high performance Object-Relational Persistence and Query service for any java application.
Hibernate sits between tradition java objects and database server to handle all the work in persisting those objects based on the appropriate O/R mechanisms and patterns.

Hibernate Advantages:
Hibernate does not require an Application server to operate. If there is change in database or in any Table then the only need to change XML file Properties. Provides simple API for Storing and retrieving java objects directly to and from the database. Hibernate takes care of mapping java classes to database table using xml files and without writing any line of code. Provides Simple query of data. Minimize database access with smart fetching strategie.
Supported Database:
Hibernate supports almost all the major RDBMS. Following is list of few of the database engines supported by Hibernate.

Hibernate First Programming:
This is a refined and working version. In this tutorial, you use the NetBeans IDE to create and deploy a Java Swing application that displays data from a database. The application uses the Hibernate framework as the persistence layer to retrieve POJOs (plain old Java objects) from a relational database.
Creating The Database:
This tutorial uses a MySQL database called sakila. The sample database is not included when you install the NetBeans IDE so you need to first create the database to follow this tutorial. The Sakila database is a free sample MySQL database that is available from the MySQL site. To create the sakila database you can download and install the Sakila Sample Database plugin using the Plugins manager. Open the Plugins manager and install the Sakila Sample Database plugin. Select Tools > Plugins.

If there are any updates, the list should be visible in the Updates page. Click the Available Plugins page.

If sakila database is not installed yet, it should be visible in the Available Plugins page. In this case select the tick box next to Sakila Sample Database and click the Install button at the bottom-left. If sakila database already installed, then it should not visible in the Available Plugins.

After you install the plugin you can create the sakila database from the Services window. The sakila database is added to the list of databases in the Create MySQL database dialog box. After installing the plugin, start the MySQL database server by expanding the Databases node in the Services window, right-clicking the MySQL Server node and choosing Start.

Select and right-click the MySQL Server node and choose Create Database menu.

Select the sakila database from the New Database Name drop down list in the Create MySQL Database dialog box.


Deselect the Grant Full Access To:. We will use MySQL root user instead (however, this is not recommended). If you have created a dedicated MySQL database user with appropriate permissions, you may want to use it and this is the recommended steps for security reasons.

Click OK. When you click OK, a Sakila database node appears under the MySQL Server node. Select and right-clicking the sakila node and choose Connect.

When you click Connect, a database connection node for the sakila database (jdbc:mysql://localhost:3306/sakila [username on Default schema]) is listed under the databases connection string node. When a connection is open you can view the data (if any) in the database by expanding the sakila database > Tables > any_table node.

To view the data, select one of the table > right-clicking mouse > select View Data context menu.

The data in the table should be visible now.

Creating the java Swing Application Project:
In this exercise you create a simple Java Swing application project called MyDVDStoreAdmin. Choose File > select New Project (Ctrl-Shift-N).

Select Java Application from the Java category and click Next.

Type MyDVDStoreAdmin for the project name and set the project location if needed. Deselect the Use Dedicated Folder option, if selected. For this tutorial there is little reason to copy project libraries to a dedicated folder because you will not need to share libraries with other users. Deselect Create Main Class. Click Finish. When you click Finish, the IDE creates the Java application project. The project does not have a main class. You will create a form and then set the form as the main class.

Adding Hibernate Support to the Project:
To add support for Hibernate to a J2SE project you need to add the Hibernate library to the project. The Hibernate library is included with the IDE and can be added to any project by right-clicking the 'Libraries' node in the Projects window, selecting 'Add Library' and then selecting the Hibernate library in the Add Library dialog box. The IDE includes wizards to help you create the Hibernate files you may need in your project. You can use the wizards in the IDE to create a Hibernate configuration file and a utility helper class. If you create the Hibernate configuration file using a wizard the IDE automatically adds the Hibernate libraries to the project.
Creating THE Hibernate Configuration File:
The Hibernate configuration file (hibernate.cfg.xml) contains information about the database connection, resource mappings, and other connection properties. When you create a Hibernate configuration file using a wizard you specify the database connection by choosing from a list of database connection registered with the IDE. When generating the configuration file the IDE automatically adds the connection details and dialect information based on the selected database connection. The IDE also automatically adds the Hibernate library to the project classpath. After you create the configuration file you can edit the file using the multi-view editor, or edit the XML directly in the XML editor. Select and right-click the Source Packages node in the Projects window and choose New > Other to open the New File wizard

Select Hibernate Configuration Wizard from the Hibernate category. Click Next

Keep the default settings in the Name and Location pane (you want to create the file in the src directory). Click Next.

Select the sakila connection in the Database Connection drop down list. Click Finish.

When you click Finish the IDE opens hibernate.cfg.xml in the source editor. The IDE creates the configuration file at the root of the context classpath of the application (in this case, in the Files window, ../classes).

In the Projects window the file is located in the of the Source Packages. The configuration file contains information about a single database. If you plan to connect to multiple databases, you can create multiple configuration files in the project, one for each database servers, but by default the helper utility class will use the hibernate.cfg.xml file located in the root location.

If you expand the Libraries node in the Projects window you can see that the IDE added the required Hibernate JAR files and the MySQL connector JAR.

Modifying the Hibernate Configuration File: In this exercise you will edit the default properties specified in hibernate.cfg.xml to enable debug logging for SQL statements. Open hibernate.cfg.xml in the Design tab. You can open the file by expanding the Configuration Files node in the Projects window and double-clicking hibernate.cfg.xml. Expand the Configuration Properties node under Optional Properties. Click Add button to open the Add Hibernate Property dialog box. In the dialog box, select the hibernate.show_sql property and set the value to true. Click OK. This enables the debug logging of the SQL statements. Click Add under the Miscellaneous Properties node and select hibernate.query.factory_class in the Property Name dropdown list. Manually, type org.hibernate.hql.classic.ClassicQueryTranslatorFactory as the Property Value. Click OK. If you click the XML tab in the editor you can see the file in XML view. Your file should look like the following: The following is the XML file content.
The following screenshot shows the content of the real hibernate.cfg.xml file. Save your changes to the file. When you run your project you will be able to see the SQL query printed in the IDE's Output window. We will see this later.
Creating the HibernateUtil.java Helper File To use Hibernate you need to create a helper class that handles startup and that accesses Hibernate's SessionFactory to obtain a Session object. The class calls Hibernate's configure() method, loads the hibernate.cfg.xml configuration file and then builds the SessionFactory to obtain the Session object. In this section you use the New File wizard to create the helper class HibernateUtil.java.
Select and right-click the Source Packages node > select New > select Other to open the New File wizard. Select Hibernate from the Categories list and HibernateUtil.java from the File Types list. Click Next. Type HibernateUtil for the class name and sakila.util as the package name. Click Finish. When you click Finish, HibernateUtil.java opens in the editor. You can close the file because you do not need to edit the file.
Generating Hibernate Mapping Files And Java Classes In this tutorial you use a plain old Java object (POJO), Actor.java, to represent the data in the table ACTOR in the database. The class specifies the fields for the columns in the tables and uses simple setters and getters to retrieve and write the data. To map Actor.java to the ACTOR table you can use a Hibernate mapping file or use annotations in the class. You can use the Reverse Engineering wizard and the Hibernate Mapping Files and POJOs from a Database wizard to create multiple POJOs and mapping files based on database tables that you select. Alternatively, you can use wizards in the IDE to help you create individual POJOs and mapping files from scratch. If you are using NetBeans IDE 6.5, you do not need to create the hibernate.reveng file with the Reverse Engineering wizard. You create the reverse engineering file and specify the database tables in the Hibernate Mapping Files and POJOs from a Database wizard. When you want to create files for multiple tables you will most likely want to use the wizards. In this tutorial you only need to create one POJO and one mapping file so it is fairly easy to create the files individually. You can see the steps for creating the POJOs and mapping files individually at the end of this tutorial.
Creating the Reverse Engineering File The reverse engineering file (hibernate.reveng.xml) is an XML file that can be used to modify the default settings used when generating Hibernate files from the metadata of the database specified in hibernate.cfg.xml. The wizard generates the file with basic default settings. You can modify the file to explicitly specify the database schema that is used, to filter out tables that should not be used and to specify how JDBC types are mapped to Hibernate types. Select and right-click the Source Packages node > select New > select Other to open the New File wizard.

Select Hibernate from the Categories list and Hibernate Reverse Engineering Wizard from the File Types list. Click Next.

Type hibernate.reveng for the file name. Keep the default src as the Location. Click Next.

Select actor in the Available Tables pane and click Add button. Click Finish.


The wizard generates a hibernate.reveng.xml reverse engineering file. You can close the reverse engineering file because you will not need to edit the file. Creating Hibernate Mapping Files and Projects From a Database The Hibernate Mapping Files and POJOs from a Database wizard generates files based on tables in a database. When you use the wizard, the IDE generates POJOs and mapping files for you based on the database tables specified in hibernate.reveng.xml and then adds the mapping entries to hibernate.cfg.xml. When you use the wizard you can choose the files that you want the IDE to generate (only the POJOs, for example) and select code generation options (generate code that uses EJB 3 annotations, for example). Select and right-click the Source Packages node in the Projects window and choose New > Other to open the New File wizard.

Select Hibernate Mapping Files and POJOs from a Database in the Hibernate category. Click Next.

Select hibernate.cfg.xml from the Hibernate Configuration File dropdown list, if not selected. Select hibernate.reveng.xml from the Hibernate Reverse Engineering File dropdown list, if not selected. Ensure that the Domain Code and Hibernate XML Mappings options are selected. Type sakila.entity for the Package name. Click Finish.

When you click Finish, the IDE generates the POJO Actor.java with all the required fields and generates a Hibernate mapping file (Actor.hbm.xml) and adds the mapping entry to hibernate.cfg.xml

Now that you have the POJO and necessary Hibernate-related files that make you ready to create a simple Java GUI front end for the application. You will also create and then add an HQL query that queries the database to retrieve the data. In this process we also use the HQL editor to build and test the query.
Creating the Application GUI In this exercise you will create a simple JFrame form with some fields for entering and displaying data. You will also add a button that will trigger a database query to retrieve the data.
Creating the JFrame Form Select and right-click the project node in the Projects window and choose New > Other to open the New File wizard.

Select JFrame Form from the Swing GUI Forms category. Click Next.

Type MyDVDStoreAdmin for the Class Name and type sakila.ui for the Package. Click Finish.

When you click Finish the IDE create the class and opens the JFrame Form in the Design view of the editor.

Adding Elements to the Form
You now need to add the user interface (UI) elements to the form. When the form is open in Design view in the editor, the Palette appears in the left side of the IDE. To add an element to the form, drag the element from the Palette into the form area. After you add an element to the form you need to modify the default value of the Variable Name property for that element. Drag a Label element from the Palette and change the text to Actor Profile.


Drag a Label element from the Palette and change the text to First Name.

Drag a Text Field element next to the First Name label and delete the default text.


Drag a Label element from the Palette and change the text to Last Name. Then, drag a Text Field element next to the Last Name label and delete the default text. Drag a Button element from the Palette and change the text to Query.

Drag a Table element from the Palette into the form.

You can modify the Variable Name value of an element by right-clicking the element in the Design view and then choosing Change Variable Name. Alternatively, you can change the Variable Name directly in the Inspector window. You do not need to assign Variable Name values to the Label elements.


The following screenshot shows how to change the variable name from the Inspector window of NetBeans 6.9.1. Just select by clicking the element and change the variable name to a new one directly.

You can test preview the GUI design by clicking the following icon.

In Design view your form should look similar to the following Figure.

Save your changes. Now that you have a form you need to create the code to assign events to the form elements. In the next exercise you will construct queries based on Hibernate Query Language (HQL) to retrieve data. After you construct the queries you will add methods to the form to invoke the appropriate query when the Query button is pressed. Build the application. Select the project root folder > right-click mouse > select Build menu.

Make sure there is no error that can be seen in the Output window.

Creating the Query in the HQL Query Editor In the IDE you can construct and test queries based on the Hibernate Query Language (HQL) using the HQL Query Editor. As you type the query the editor shows the equivalent (translated) SQL query. When you click the 'Run HQL Query' button in the toolbar, the IDE executes the query and shows the results at the bottom of editor. In this exercise you use the HQL Editor to construct simple HQL queries that retrieve a list of actors' details based on matching the first name or last name (not both). Before you add the query to the class you will use the HQL Query Editor to test that the connection is working correctly and that the query produces the desired results. Expand the source package node in the Projects window.
Select and right-click hibernate.cfg.xml file and choose Run HQL Query to open the HQL Query Editor.

Test the connection by typing 'from Actor' (make sure the 'A' in 'Actor' is a capital letter) in the HQL Query Editor. Click the Run HQL Query in the toolbar. When you click Run HQL Query you should see the query results in the bottom pane of the HQL Query Editor.


If you click the SQL button above the results you should see the following equivalent SQL query.


Type the following query in the HQL Query Editor and click Run HQL Query to check the query results when the search string is 'PE'.
The query returns a list of actors' details for those actors whose first names begin with 'PE'.


Open a new HQL Query Editor and type the following query in the editor pane. Click Run HQL Query.

The query returns a list of actors' details for those actors whose last names begin with 'MO'. The SQL version is shown below when you clicking the SQL button.

Testing the queries shows that the queries return the desired results. The next step is to implement the queries in the application so that the appropriate query is invoked by clicking the Query button in the form.
Adding the Query to the Form
You now need to modify MyDVDStoreAdmin.java to add the query strings and create the methods to construct and invoke a query that incorporates the input variables. You also need to modify the button event handler to invoke the correct query and add a method to display the query results in the table. Open MyDVDStoreAdmin.java and click the Source tab.

Add the following query strings (in bold) to the class.
public MyDVDStoreAdmin() {
initComponents();
}
private static String QUERY_BASED_ON_FIRST_NAME="from Actor a where a.firstName like '";

Hibernate Advantages:
Hibernate does not require an Application server to operate. If there is change in database or in any Table then the only need to change XML file Properties. Provides simple API for Storing and retrieving java objects directly to and from the database. Hibernate takes care of mapping java classes to database table using xml files and without writing any line of code. Provides Simple query of data. Minimize database access with smart fetching strategie.
Supported Database:
Hibernate supports almost all the major RDBMS. Following is list of few of the database engines supported by Hibernate.
- HSQL Database Engine.
- DB2/NT
- MYSQL
- Postgre SQL
- FrontBase
- Oracle
- Microsoft SQl Server Database
- Sybase SQl Server
- Infomix Dynamic Server
- XDoclet Spring
- J2EE
- Eclipse Plug-ins
- Maven Hibernate

Hibernate First Programming:
This is a refined and working version. In this tutorial, you use the NetBeans IDE to create and deploy a Java Swing application that displays data from a database. The application uses the Hibernate framework as the persistence layer to retrieve POJOs (plain old Java objects) from a relational database.
Creating The Database:
This tutorial uses a MySQL database called sakila. The sample database is not included when you install the NetBeans IDE so you need to first create the database to follow this tutorial. The Sakila database is a free sample MySQL database that is available from the MySQL site. To create the sakila database you can download and install the Sakila Sample Database plugin using the Plugins manager. Open the Plugins manager and install the Sakila Sample Database plugin. Select Tools > Plugins.

If there are any updates, the list should be visible in the Updates page. Click the Available Plugins page.

If sakila database is not installed yet, it should be visible in the Available Plugins page. In this case select the tick box next to Sakila Sample Database and click the Install button at the bottom-left. If sakila database already installed, then it should not visible in the Available Plugins.

After you install the plugin you can create the sakila database from the Services window. The sakila database is added to the list of databases in the Create MySQL database dialog box. After installing the plugin, start the MySQL database server by expanding the Databases node in the Services window, right-clicking the MySQL Server node and choosing Start.

Select and right-click the MySQL Server node and choose Create Database menu.

Select the sakila database from the New Database Name drop down list in the Create MySQL Database dialog box.


Deselect the Grant Full Access To:. We will use MySQL root user instead (however, this is not recommended). If you have created a dedicated MySQL database user with appropriate permissions, you may want to use it and this is the recommended steps for security reasons.

Click OK. When you click OK, a Sakila database node appears under the MySQL Server node. Select and right-clicking the sakila node and choose Connect.

When you click Connect, a database connection node for the sakila database (jdbc:mysql://localhost:3306/sakila [username on Default schema]) is listed under the databases connection string node. When a connection is open you can view the data (if any) in the database by expanding the sakila database > Tables > any_table node.

To view the data, select one of the table > right-clicking mouse > select View Data context menu.

The data in the table should be visible now.

Creating the java Swing Application Project:
In this exercise you create a simple Java Swing application project called MyDVDStoreAdmin. Choose File > select New Project (Ctrl-Shift-N).

Select Java Application from the Java category and click Next.

Type MyDVDStoreAdmin for the project name and set the project location if needed. Deselect the Use Dedicated Folder option, if selected. For this tutorial there is little reason to copy project libraries to a dedicated folder because you will not need to share libraries with other users. Deselect Create Main Class. Click Finish. When you click Finish, the IDE creates the Java application project. The project does not have a main class. You will create a form and then set the form as the main class.

Adding Hibernate Support to the Project:
To add support for Hibernate to a J2SE project you need to add the Hibernate library to the project. The Hibernate library is included with the IDE and can be added to any project by right-clicking the 'Libraries' node in the Projects window, selecting 'Add Library' and then selecting the Hibernate library in the Add Library dialog box. The IDE includes wizards to help you create the Hibernate files you may need in your project. You can use the wizards in the IDE to create a Hibernate configuration file and a utility helper class. If you create the Hibernate configuration file using a wizard the IDE automatically adds the Hibernate libraries to the project.
Creating THE Hibernate Configuration File:
The Hibernate configuration file (hibernate.cfg.xml) contains information about the database connection, resource mappings, and other connection properties. When you create a Hibernate configuration file using a wizard you specify the database connection by choosing from a list of database connection registered with the IDE. When generating the configuration file the IDE automatically adds the connection details and dialect information based on the selected database connection. The IDE also automatically adds the Hibernate library to the project classpath. After you create the configuration file you can edit the file using the multi-view editor, or edit the XML directly in the XML editor. Select and right-click the Source Packages node in the Projects window and choose New > Other to open the New File wizard

Select Hibernate Configuration Wizard from the Hibernate category. Click Next

Keep the default settings in the Name and Location pane (you want to create the file in the src directory). Click Next.

Select the sakila connection in the Database Connection drop down list. Click Finish.

When you click Finish the IDE opens hibernate.cfg.xml in the source editor. The IDE creates the configuration file at the root of the context classpath of the application (in this case, in the Files window, ../classes).

In the Projects window the file is located in the

If you expand the Libraries node in the Projects window you can see that the IDE added the required Hibernate JAR files and the MySQL connector JAR.

Modifying the Hibernate Configuration File: In this exercise you will edit the default properties specified in hibernate.cfg.xml to enable debug logging for SQL statements. Open hibernate.cfg.xml in the Design tab. You can open the file by expanding the Configuration Files node in the Projects window and double-clicking hibernate.cfg.xml. Expand the Configuration Properties node under Optional Properties. Click Add button to open the Add Hibernate Property dialog box. In the dialog box, select the hibernate.show_sql property and set the value to true. Click OK. This enables the debug logging of the SQL statements. Click Add under the Miscellaneous Properties node and select hibernate.query.factory_class in the Property Name dropdown list. Manually, type org.hibernate.hql.classic.ClassicQueryTranslatorFactory as the Property Value. Click OK. If you click the XML tab in the editor you can see the file in XML view. Your file should look like the following: The following is the XML file content.
The following screenshot shows the content of the real hibernate.cfg.xml file. Save your changes to the file. When you run your project you will be able to see the SQL query printed in the IDE's Output window. We will see this later.
Creating the HibernateUtil.java Helper File To use Hibernate you need to create a helper class that handles startup and that accesses Hibernate's SessionFactory to obtain a Session object. The class calls Hibernate's configure() method, loads the hibernate.cfg.xml configuration file and then builds the SessionFactory to obtain the Session object. In this section you use the New File wizard to create the helper class HibernateUtil.java.
Select and right-click the Source Packages node > select New > select Other to open the New File wizard. Select Hibernate from the Categories list and HibernateUtil.java from the File Types list. Click Next. Type HibernateUtil for the class name and sakila.util as the package name. Click Finish. When you click Finish, HibernateUtil.java opens in the editor. You can close the file because you do not need to edit the file.
Generating Hibernate Mapping Files And Java Classes In this tutorial you use a plain old Java object (POJO), Actor.java, to represent the data in the table ACTOR in the database. The class specifies the fields for the columns in the tables and uses simple setters and getters to retrieve and write the data. To map Actor.java to the ACTOR table you can use a Hibernate mapping file or use annotations in the class. You can use the Reverse Engineering wizard and the Hibernate Mapping Files and POJOs from a Database wizard to create multiple POJOs and mapping files based on database tables that you select. Alternatively, you can use wizards in the IDE to help you create individual POJOs and mapping files from scratch. If you are using NetBeans IDE 6.5, you do not need to create the hibernate.reveng file with the Reverse Engineering wizard. You create the reverse engineering file and specify the database tables in the Hibernate Mapping Files and POJOs from a Database wizard. When you want to create files for multiple tables you will most likely want to use the wizards. In this tutorial you only need to create one POJO and one mapping file so it is fairly easy to create the files individually. You can see the steps for creating the POJOs and mapping files individually at the end of this tutorial.
Creating the Reverse Engineering File The reverse engineering file (hibernate.reveng.xml) is an XML file that can be used to modify the default settings used when generating Hibernate files from the metadata of the database specified in hibernate.cfg.xml. The wizard generates the file with basic default settings. You can modify the file to explicitly specify the database schema that is used, to filter out tables that should not be used and to specify how JDBC types are mapped to Hibernate types. Select and right-click the Source Packages node > select New > select Other to open the New File wizard.

Select Hibernate from the Categories list and Hibernate Reverse Engineering Wizard from the File Types list. Click Next.

Type hibernate.reveng for the file name. Keep the default src as the Location. Click Next.

Select actor in the Available Tables pane and click Add button. Click Finish.


The wizard generates a hibernate.reveng.xml reverse engineering file. You can close the reverse engineering file because you will not need to edit the file. Creating Hibernate Mapping Files and Projects From a Database The Hibernate Mapping Files and POJOs from a Database wizard generates files based on tables in a database. When you use the wizard, the IDE generates POJOs and mapping files for you based on the database tables specified in hibernate.reveng.xml and then adds the mapping entries to hibernate.cfg.xml. When you use the wizard you can choose the files that you want the IDE to generate (only the POJOs, for example) and select code generation options (generate code that uses EJB 3 annotations, for example). Select and right-click the Source Packages node in the Projects window and choose New > Other to open the New File wizard.

Select Hibernate Mapping Files and POJOs from a Database in the Hibernate category. Click Next.

Select hibernate.cfg.xml from the Hibernate Configuration File dropdown list, if not selected. Select hibernate.reveng.xml from the Hibernate Reverse Engineering File dropdown list, if not selected. Ensure that the Domain Code and Hibernate XML Mappings options are selected. Type sakila.entity for the Package name. Click Finish.

When you click Finish, the IDE generates the POJO Actor.java with all the required fields and generates a Hibernate mapping file (Actor.hbm.xml) and adds the mapping entry to hibernate.cfg.xml

Now that you have the POJO and necessary Hibernate-related files that make you ready to create a simple Java GUI front end for the application. You will also create and then add an HQL query that queries the database to retrieve the data. In this process we also use the HQL editor to build and test the query.
Creating the Application GUI In this exercise you will create a simple JFrame form with some fields for entering and displaying data. You will also add a button that will trigger a database query to retrieve the data.
Creating the JFrame Form Select and right-click the project node in the Projects window and choose New > Other to open the New File wizard.

Select JFrame Form from the Swing GUI Forms category. Click Next.

Type MyDVDStoreAdmin for the Class Name and type sakila.ui for the Package. Click Finish.

When you click Finish the IDE create the class and opens the JFrame Form in the Design view of the editor.

Adding Elements to the Form
You now need to add the user interface (UI) elements to the form. When the form is open in Design view in the editor, the Palette appears in the left side of the IDE. To add an element to the form, drag the element from the Palette into the form area. After you add an element to the form you need to modify the default value of the Variable Name property for that element. Drag a Label element from the Palette and change the text to Actor Profile.


Drag a Label element from the Palette and change the text to First Name.

Drag a Text Field element next to the First Name label and delete the default text.


Drag a Label element from the Palette and change the text to Last Name. Then, drag a Text Field element next to the Last Name label and delete the default text. Drag a Button element from the Palette and change the text to Query.

Drag a Table element from the Palette into the form.

You can modify the Variable Name value of an element by right-clicking the element in the Design view and then choosing Change Variable Name. Alternatively, you can change the Variable Name directly in the Inspector window. You do not need to assign Variable Name values to the Label elements.


The following screenshot shows how to change the variable name from the Inspector window of NetBeans 6.9.1. Just select by clicking the element and change the variable name to a new one directly.

You can test preview the GUI design by clicking the following icon.

In Design view your form should look similar to the following Figure.

Save your changes. Now that you have a form you need to create the code to assign events to the form elements. In the next exercise you will construct queries based on Hibernate Query Language (HQL) to retrieve data. After you construct the queries you will add methods to the form to invoke the appropriate query when the Query button is pressed. Build the application. Select the project root folder > right-click mouse > select Build menu.

Make sure there is no error that can be seen in the Output window.

Creating the Query in the HQL Query Editor In the IDE you can construct and test queries based on the Hibernate Query Language (HQL) using the HQL Query Editor. As you type the query the editor shows the equivalent (translated) SQL query. When you click the 'Run HQL Query' button in the toolbar, the IDE executes the query and shows the results at the bottom of editor. In this exercise you use the HQL Editor to construct simple HQL queries that retrieve a list of actors' details based on matching the first name or last name (not both). Before you add the query to the class you will use the HQL Query Editor to test that the connection is working correctly and that the query produces the desired results. Expand the

Test the connection by typing 'from Actor' (make sure the 'A' in 'Actor' is a capital letter) in the HQL Query Editor. Click the Run HQL Query in the toolbar. When you click Run HQL Query you should see the query results in the bottom pane of the HQL Query Editor.

If you click the SQL button above the results you should see the following equivalent SQL query.


Type the following query in the HQL Query Editor and click Run HQL Query to check the query results when the search string is 'PE'.
The query returns a list of actors' details for those actors whose first names begin with 'PE'.


Open a new HQL Query Editor and type the following query in the editor pane. Click Run HQL Query.

The query returns a list of actors' details for those actors whose last names begin with 'MO'. The SQL version is shown below when you clicking the SQL button.

Testing the queries shows that the queries return the desired results. The next step is to implement the queries in the application so that the appropriate query is invoked by clicking the Query button in the form.
Adding the Query to the Form
You now need to modify MyDVDStoreAdmin.java to add the query strings and create the methods to construct and invoke a query that incorporates the input variables. You also need to modify the button event handler to invoke the correct query and add a method to display the query results in the table. Open MyDVDStoreAdmin.java and click the Source tab.

Add the following query strings (in bold) to the class.
public MyDVDStoreAdmin() {
initComponents();
}
private static String QUERY_BASED_ON_FIRST_NAME="from Actor a where a.firstName like '";
The following is the screenshot for the code. It is possible to copy the queries from the HQL Query Editor tabs into the file and then modify the code.

The following is the screenshot. Just leave the error at this stage we will add the executeHQLQuery() method in the next step.

Add the executeHQLQuery() method. The executeHQLQuery() method calls Hibernate to execute the selected query. This method makes use of the HibernateUtil.java utility class to obtain the Hibernate Session.
The following is the screenshot for the code.

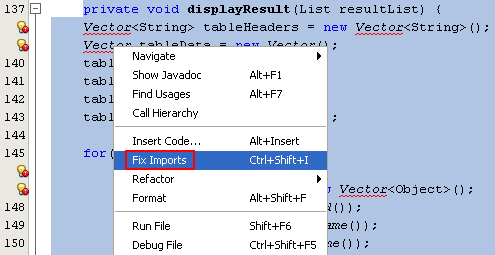
Fix your imports to add import statements for the Hibernate libraries (org.hibernate.Query and org.hibernate.Session) and java.util.List.


Just leave the last error as is. We will add the displayResult() method later.

Create a Query button event handler by switching to the Design view and double-clicking the Query button or select the button > right-click mouse > select Events menu > select Action menu > select actionPerformed menu.

The IDE creates the queryButtonActionPerformed() method and displays the method in the Source view. Modify the queryButtonActionPerformed() method in the Source view by adding the following code so that a query is run when the user clicks the button.
The following is the screenshot for the code.

Add the following method to display the results in the JTable table.
The following is the screenshot for the code.

Fix your imports to add java.util.Vector and save your changes. After you save the form you can run the project.

Running the Project Now that the coding is finished, you can launch the application. Firstly you may want to build the project. Select the project root folder > right-click mouse > select Build menu.

Before you run the project, you need to specify the application's Main Class in the project's properties dialog box. If no Main Class is specified, you are prompted to set it the first time that you run the application. Select the project root folder > right-click mouse > select Run menu.

Select sakila.ui.MyDVDStoreAdmin for the Main Class. Click OK.

Type in a search string in the First Name or Last Name text field and click Query to search for an actor and see the details. The following screenshots show some examples.


Creating POJOs and Mapping Files Individually Note: This exercise is optional and describes how to create the POJO and mapping file that you created with the Hibernate Mapping Files and POJOs from Database wizard. Because a POJO is a simple Java class you can use the New Java Class wizard to create the class and then edit the class in the source editor to add the necessary fields and getters and setters. After you create the POJO you then use a wizard to create a Hibernate mapping file to map the class to the table and add mapping information to hibernate.cfg.xml. When you create a mapping file from scratch you need to map the fields to the columns in the XML editor. Right-click the Source Packages node in the Projects window > right-click mouse > choose New > Java Class to open the New Java Class wizard.

In the wizard, type MyActor for the class name and type sakila.entity for the package. Click Finish.

Make the following changes to the class to implement the Serializable interface and add fields for the table columns.
The following is the screenshot for the code.


In the Generate Getters and Setters dialog box, select all the fields and click Generate

In the Generate Getters and Setters dialog box, you can use the Up arrow on the keyboard to move the selected item to the MyActor node and then press the Space bar to select all fields in MyActor. Fix your imports and save your changes. Right click mouse anywhere in the editor > select Fix Imports context menu


After you create the POJO for the table you will want to create the Hibernate Mapping File for MyActor.java. Right-click the Source Packages node in the Projects window and choose New > Other to open the New File wizard.

Select Hibernate Mapping Wizard in the Hibernate category. Click Next

Type MyActor.hbm for the File Name and check that the Folder is src/sakila/entity. Click Next

Type sakila.entity.MyActor for the Class to Map and select 'actor' from the Database Table drop down list. Click Finish.

When you click Finish the MyActor.hbm.xml Hibernate mapping file opens in the source editor.

The IDE also automatically adds an entry for the mapping resource to hibernate.cfg.xml. You can view the entry details by expanding the Mappings node in the Design view of hibernate.cfg.xml file.

or in the XML view. The mapping entry in the XML view will look like the following:
The following screenshot shows the complete XML file content.

Map the fields in MyActor.java to the columns in the Actor table by making the following changes to MyActor.hbm.xml.
The following screenshot shows MyActor.hbm.xml file content.

You can use code completion in the editor to complete the values when modifying the mapping file. Note: By default, the generated class element has a closing tag. Because you need to add property elements between the opening and closing class element tags, you need to make the following changes. After making the changes you can then use code completion between the class tags.
The following screenshot shows the code completion in action.

Click the Validate XML button in the toolbar and save your changes.

Subscribe to:
Posts
(
Atom
)


